Category Archives: Arts and Crafts

The Magic of Blocking – How to Wet Block

Wet blocking is basically a highly controlled version of what happens when you put a wool sweater in the washing machine. You take all your hard work, swish it around in some warm sudsy water, tug on it a little, and when it dries it looks finished and professional.

I am explaining how I personally wet block. This works great for me, and blocking can really transform something that isn’t laying quite right.

Fill up a clean sink or a small washtub with warm water. If you wouldn’t bathe an infant in it, it’s too hot. Add a dab of wool soap if you have it. If you don’t, do what I do and add a dab of gentle shampoo. Hair’s a natural fiber too. You don’t want bubbles, a drop the size of a dime is more than enough.

Dunk your piece into the tub and swish it around. Be gentle; you aren’t trying to felt, you just want to get it good and wet. Don’t scrub it, just submerge and swish.

Drain the tub and fill it with cool water. Gently swish your piece again to get the suds out. Drain the tub and press your piece to get out some water.

You’ll need a bit of space for the next part. Spread out a towel and lay your piece out on a flat surface (like the floor). Roll it up and squeeze to get out some water. Treat it like fancy lingerie, roll don’t wring.

Spread out another towel and lay your piece out again. If it’s still wet, do another roll-up.

Once your piece isn’t dripping, begin shaping. First, give a little tug on all the corners to “set” your stitches. Next, do whatever to make it look the way you want. Squeeze those ribbed cuffs in your hand to make them tighter. Stretch out that wonky sleeve. Grab some pins and tack down any rolling corners, or use them to stretch out lace stitches. At this stage you should be able to mold your work like bread dough, but be gentle! It still has limits.

After you’ve got all the dimensions and stitches looking just like you want, leave your piece to dry. This could take a day or two. But when you’re done, it will look finished and fabulous!

::Note:: Blocking only works with natural fibers. I use the same method with pure wool, linen, whatever. But if you’re nervous about blocking a delicate yarn, look up steam blocking, or just try pinning the piece in place and misting with a spray bottle.

Hope this helps!

Girlie Hat, aka the Hipster Beanie or Granny Hat (Free People Inspired)

This is a quick and easy pattern for the kind of slouchy, bad-hair-day-covering beret that is sometimes known as the Hipster Beanie. Slouchy beanies are comfy as hell and keep your ears warm without seriously squashing your hair. They also look good on most people, including those that “can’t pull off hats.” Trust me, I am one of those people that look absolutely ridiculous in most winter headgear and I still feel foxy as Betty White in this bad boy.

This model is plain and simple, modeled after the Vintage Tam Rose Beret which was voted a “Customer Favorite” on  Free People. The Girlie Hat is also the soft, feminine cousin of the more fitted Manly Hat. I am all about His & Hers.

Any DK weight yarn works for this project. I used Patons Classic Wool in Water Chestnut. Use a 5.5 mm hook, or one size up from what the package recommends for a crochet project.

Dimensions: 26.5 cm/approx. 10 inches across.

Abbreviations: DC = double crochet, sl st = slip stitch, DCtog = Double crochet together. SC = single crochet. To DCtog: *Yarn over, insert hook in next stitch, yarn over, draw yarn through stitch, yarn over, draw yarn through 2 loops on hook* twice, yarn over, draw yarn through 3 loops on hook.

Begin using the “Magic Loop Method“. Chain 3 as first DC, DC 11 into ring. Join with a sl st in top of first chain. (12 DC).

Row 2: Chain 3, make 2 DC in next stitch and in next 10 stitches. Make another DC into the loop with the first chain of 3. Join with sl st in top of first chain. (24 DC).

Row 3: Chain 2, *make 2 DC in next stitch, 1 DC in following stitch* all the way around. Join with sl st in top of first chain. Using a turning chain of 2 only makes a smaller gap in between rows. (36 DC).

Row 4: Chain 2, DC in next stitch. 2 DC in following stitch. *DC once in each of next two stitches, 2 DC in next stitch* all the way around. Join with sl st in top of first chain. (48 DC).

Row 5: Chain 2, DC in next two stitches. *2 DC in following stitch, DC once in each of next three stitches* all the way around. Join with sl st in top of first chain. (60 DC).

Row 6: Chain 2, DC in next three stitches. *2 DC in following stitch, DC once in each of next 4 stitches* all the way around. Join with sl st in top of first chain. (72 DC).

Row 7: Chain 2, DC in next four stitches. *2 DC in following stitch, DC once in each of next 5 stitches* all the way around. Join with sl st in top of first chain. (84 DC).

Row 8: Chain 2, DC in next 5 stitches. *2 DC in following stitch, DC once in each of next 6 stitches* all the way around. Join with sl st in top of first chain. (96 DC).

Row 9: Chain 2, DC in next 6 stitches. *2 DC in following stitch, DC once in each of next 7 stitches* all the way around. Join with sl st in top of first chain. (108 DC).

Row 10: Chain 2, DC in next 7 stitches. *2 DC in following stitch, DC once in each of next 8 stitches* all the way around. Join with sl st in top of first chain. (110 DC).

Row 11-12: Work even. The hat will look like a very large pancake at this stage. Not to worry.

Row 13 and 14: Ch 2, DC in next 4 stitches. *DCtog, 1 DC in each of next 5 stitches* all the way around.

Row 16: Work even.

Row 17: Ch 1, SC in BACK LOOP ONLY of each stitch all the way around. Join with sl st.

Row 18 and finishing: Work even for 1 inch in SC. Fasten off.

Try on the hat to see how it fits, then wet block. Tack on an embellishment of your choice and enjoy. I like a big brooch, or you can try a bow like this one from creativeyarn (I made mine slightly  larger).

::Note:: I improvised this pattern and wrote the instructions later. Toward the end, the stitch count on my actual hat differs a bit from the pattern here. If anything, the pattern is more symmetrical. It’s meant to be a sloppy hat, so just go with it.

::Note:: This is the same concept as the Manly Hat, and most hats really. Whatever number of stitches you start with, you want to increase by that number of stitches every round. This should make a nice, even, slightly curved piece of fabric that looks like a yarmulke. When the thing is wide enough to fit on your melon, begin to work even. This should cause the edges to roll slightly inward, bringing that nice even yarmulke shape into a dome.

If your hat is coming out too big, try starting with 10 stitches, or even 8. Also, you can make Row 16 another decrease row. Instead of working even, DCtog every 5 stitches.

Hot Little Handwarmers

I have a craft crush on creativeyarn’s blog. I will admit it. She whips up handwarmers and crocheted necklaces like nobody’s business AND shares a bunch of her patterns with all the world.

I just finished a pair of her “Emerald Green Handwarmers,” which are little fingerless gloves worked up flat and then sewn together. Her pattern does not taper at all, meaning it’s the same width at the wrist as it is through the hand and fingers. This did not fit me at all, so I tried altering it a bit. I  still love this pattern, and should note that I also didn’t swatch and I have very small hands. AND I used acrylic yarn, so most of the problems I had could have been solved with some good blocking. So give her pattern a whirl, with or without my changes. I added some shaping and an edging around the thumbhole, and switched the yarn to a flaming hot pink.

Cast on 28 stitches, leaving a long tail for sewing seam later.

Work in moss stitch (row 1, knit 1, purl 1 all the way across. row 2, purl 1, knit 1 all the way across) for three rows. Work in stockinette for 11 rows, ending with a knit row.

Purl 5, increase one using bar increase made purlwise. *Purl 4, increase one stitch using bar increase made purlwise*  all the way across. At least, I think this is what I did. You want to increase 5 stitches spaced out evenly across your last stockinette row.

Continue according to creativeyarn’s pattern, working with 33 stitches. Bind off loosely in pattern leaving a very long tail for sewing AND thumbhole. (note: if you have little hands, I recommend doing only 5 repeats of the pattern.)

To make thumbhole:

Starting from bottom and using long tail left over from cast-on, sew first 2 inches of seam shut.

Starting from top and using long tail from bind-off, sew 2 inches of seam shut. Switch to a 5.00 mm crochet hook and pick up stitches around open thumbhole. This is a little tricky as the edge won’t be perfectly even. You should have around 15 stitches. Chain one, and single crochet all the way around twice. Do not chain one at the beginning of round 2, just work in a spiral. Snip excess yarn, pull end through, and weave in all ends.

Love!

Blueberry Pie Halter

I recently found a half-finished bohemian-looking crocheted halter top lurking in my closet. I started the piece in high school using a pattern from Debbie Stoller’s The Happy Hooker. The book calls it “Blissful,” and it’s a lacy, skimpy, summer top done with a pretty wave stitch and lightweight linen. The pattern  works up much smaller than I intended, but I like the style and it’s simple enough to customize for a better fit. I’m also not sure if the wonky sizing is because of poor directions or my refusal to swatch (ever).

I made this according to the book’s directions for a size small.  I’m petite, but this finished up looking fit for a pre-teen. I added a few extra rows of the wave pattern on the skirt for length and had to alter the bust. I started with slowing down the decreases on the cups, but they were still wayyy too small so I added this shell edging. It adds a good two inches on the sides of each cup, and goes nicely with the skirt’s wave pattern.The original pattern also calls for closing up the back with hook and eyes. Mine was way too small to reach around my whole body, but I don’t mind the apron style and just tied it with a ribbon and called it good.

I recommend picking this book up from the library and giving this top (found on page 158) a go. Try a size bigger than what you usually do and don’t be afraid to play with the pattern. Directions for my super simple shell border are given below.

Variation:

With right side facing, join yarn at bottom left edge of left cup. Make 30 single crochet (or a multiple of six that fits your size) evenly spaced along edge. Chain one. Single crochet in second chain from hook and in next 29 stitches. Chain 2, single crochet in the second chain from the hook, then skip two chains and make 5 double crochets in the next chain. Skip the next two chains and make a single crochet in the next chain. Repeat pattern of *Skip two stitches, 5 DC in next stitch, skip two stitches, 1 single crochet in next stitch* all the way down. You should have 5 shells. Anchor with a few slip stitches along bodice edge. Repeat on outside edge of right cup.

I should have made a shell border on the inside as well, but was in a hurry to finish.

Love!!!

Manly Hat

Men are notoriously hard to craft for, but damn it all if I don’t get the warm fuzzies whipping up something toasty for my man.

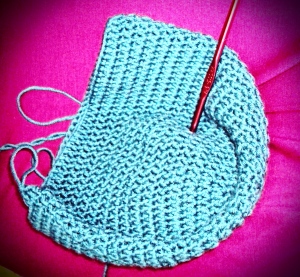
This pattern is for the kind of solid, fitted beanie popular with foxy snowboarders, college kids, and boyfriends. This is a great portable project, easy to remember and you only have one ball of yarn to truck around.

Yarn is 2 balls of Debbie Bliss Rialto Dk in 23020, a slate blue, 100% Merino extrafine superwash. Hook is an H/5.00 mm. Nice and warm, but still fits under a helmet.

Begin using the “Magic Loop Method.” Click the link for a quick tutorial. This cast-on was new to me, but easy to learn and wonderful for hats, small toys, or any project where you want an invisible start rather than a hole.

Abbreviations: DC = double crochet, sl st = slip stitch, DCtog = Double crochet together. To DCtog: *Yarn over, insert hook in next stitch, yarn over, draw yarn through stitch, yarn over, draw yarn through 2 loops on hook* twice, yarn over, draw yarn through 3 loops on hook.

Round 1: Chain 3 (acts as first double crochet), 9 DC into magic loop. Sl st into top of first chain. You now have ten DC in magic loop. Pull loop taut, and be in awe of how the hole disappears!

Round 2: Chain 2 (see note at bottom), 2 DC into every stitch all the way around. End with sl st into first chain (20 DC).

Round 3: Chain 2. *1 DC in next stitch, 2 DC in following stitch* all the way around. End with sl st into first chain (30 DC).

Round 4: Chain 2. *1 DC in next two stitches, 2 DC in following stitch* all the way around. End with sl st into first chain (40 DC).

Round 5: Chain 2. *1 DC in next three stitches, 2 DC in following stitch* all the way around. End with sl st into first chain (50 DC).

Round 6: Chain 2. *1 DC in next four stitches, 2 DC in following stitch* all the way around. End with sl st into first chain (60 DC).

Round 7: Chain 2. *1 DC in next five stitches, 2 DC in following stitch* all the way around. End with sl st into first chain (70 DC).

Round 8: Chain 2. *1 DC in next six stitches, 2 DC in following stitch* all the way around. End with sl st into first chain (80 DC).

Round 9 and continuing: Work even until hat is desired length. For me, this was 23 rows total.

Optional: Folded Brim

Round 24 (or whatever. Folded brim will be flipped up, so begin these instructions after working to your desired final length.): Chain 2. *1 DC in front loop only of next 12 stitches. DCtog* all the way around. End with slip stitch into first chain (75 DC).

Round 25-28: 1 DC in each stitch all the way around. Fasten off.

The brim should turn up naturally with the front-loop-only row.

* Chaining only 2 stitches at the beginning of each round makes for a smaller, neater seam. If you’re used to chaining 3 stitches, it takes a bit of getting used to but it looks much nicer.