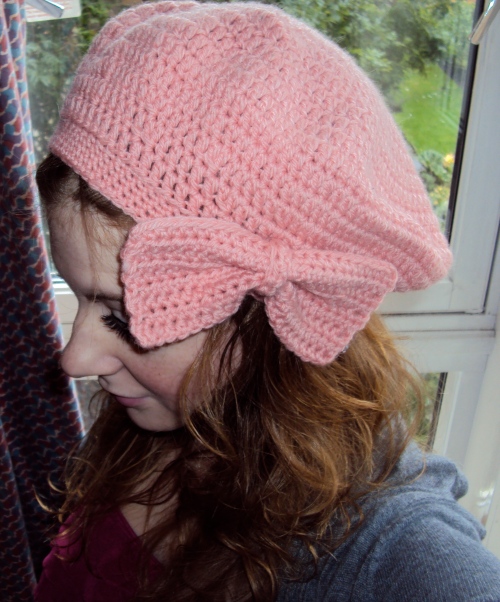
This is a quick and easy pattern for the kind of slouchy, bad-hair-day-covering beret that is sometimes known as the Hipster Beanie. Slouchy beanies are comfy as hell and keep your ears warm without seriously squashing your hair. They also look good on most people, including those that “can’t pull off hats.” Trust me, I am one of those people that look absolutely ridiculous in most winter headgear and I still feel foxy as Betty White in this bad boy.
This model is plain and simple, modeled after the Vintage Tam Rose Beret which was voted a “Customer Favorite” on Free People. The Girlie Hat is also the soft, feminine cousin of the more fitted Manly Hat. I am all about His & Hers.
Any DK weight yarn works for this project. I used Patons Classic Wool in Water Chestnut. Use a 5.5 mm hook, or one size up from what the package recommends for a crochet project.
Dimensions: 26.5 cm/approx. 10 inches across.
Abbreviations: DC = double crochet, sl st = slip stitch, DCtog = Double crochet together. SC = single crochet. To DCtog: *Yarn over, insert hook in next stitch, yarn over, draw yarn through stitch, yarn over, draw yarn through 2 loops on hook* twice, yarn over, draw yarn through 3 loops on hook.
Begin using the “Magic Loop Method“. Chain 3 as first DC, DC 11 into ring. Join with a sl st in top of first chain. (12 DC).
Row 2: Chain 3, make 2 DC in next stitch and in next 10 stitches. Make another DC into the loop with the first chain of 3. Join with sl st in top of first chain. (24 DC).
Row 3: Chain 2, *make 2 DC in next stitch, 1 DC in following stitch* all the way around. Join with sl st in top of first chain. Using a turning chain of 2 only makes a smaller gap in between rows. (36 DC).
Row 4: Chain 2, DC in next stitch. 2 DC in following stitch. *DC once in each of next two stitches, 2 DC in next stitch* all the way around. Join with sl st in top of first chain. (48 DC).
Row 5: Chain 2, DC in next two stitches. *2 DC in following stitch, DC once in each of next three stitches* all the way around. Join with sl st in top of first chain. (60 DC).
Row 6: Chain 2, DC in next three stitches. *2 DC in following stitch, DC once in each of next 4 stitches* all the way around. Join with sl st in top of first chain. (72 DC).
Row 7: Chain 2, DC in next four stitches. *2 DC in following stitch, DC once in each of next 5 stitches* all the way around. Join with sl st in top of first chain. (84 DC).
Row 8: Chain 2, DC in next 5 stitches. *2 DC in following stitch, DC once in each of next 6 stitches* all the way around. Join with sl st in top of first chain. (96 DC).
Row 9: Chain 2, DC in next 6 stitches. *2 DC in following stitch, DC once in each of next 7 stitches* all the way around. Join with sl st in top of first chain. (108 DC).
Row 10: Chain 2, DC in next 7 stitches. *2 DC in following stitch, DC once in each of next 8 stitches* all the way around. Join with sl st in top of first chain. (110 DC).
Row 11-12: Work even. The hat will look like a very large pancake at this stage. Not to worry.
Row 13 and 14: Ch 2, DC in next 4 stitches. *DCtog, 1 DC in each of next 5 stitches* all the way around.
Row 16: Work even.
Row 17: Ch 1, SC in BACK LOOP ONLY of each stitch all the way around. Join with sl st.
Row 18 and finishing: Work even for 1 inch in SC. Fasten off.
Try on the hat to see how it fits, then wet block. Tack on an embellishment of your choice and enjoy. I like a big brooch, or you can try a bow like this one from creativeyarn (I made mine slightly larger).
::Note:: I improvised this pattern and wrote the instructions later. Toward the end, the stitch count on my actual hat differs a bit from the pattern here. If anything, the pattern is more symmetrical. It’s meant to be a sloppy hat, so just go with it.
::Note:: This is the same concept as the Manly Hat, and most hats really. Whatever number of stitches you start with, you want to increase by that number of stitches every round. This should make a nice, even, slightly curved piece of fabric that looks like a yarmulke. When the thing is wide enough to fit on your melon, begin to work even. This should cause the edges to roll slightly inward, bringing that nice even yarmulke shape into a dome.
If your hat is coming out too big, try starting with 10 stitches, or even 8. Also, you can make Row 16 another decrease row. Instead of working even, DCtog every 5 stitches.


